
|
|
|
This Article was written in 2004 Son of MPPEBudgeted performance volvo B20 by sberry
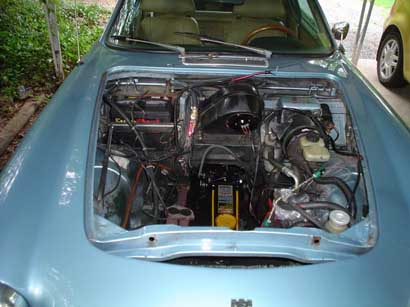
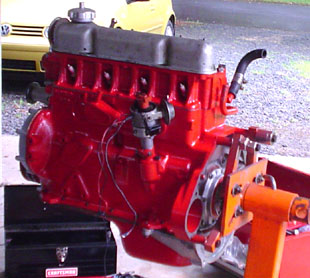
I was getting compressions of 150-150-150-180 when the motor was warm. Driving a friend's 71E which had noticeably more 'go' I realized I was definitely down on power. The first thing I did was completely troubleshoot the fuel injection system and max out the timing. A little bit of advance and a properly configured djet did wonders for performance. I drove several thousand miles with this motor including some long trips without losing much oil and maintaining good looking plugs. I decided to pull the head and take a look around. Yanking the head off revealed a leak across cylinders 2 & 3 in the headgasket and some ugly carbon. The cylinder walls were surprisingly smooth and I was crossing my fingers that I could reuse the pistons with some new rings. I had access to a hoist so I yanked and disassembled the bottom end. Here I saw the true story. 3 pistons came out with the rings in multiple pieces. One cylinder had enough abnormal wear to force a bore to the next oversize and therefore new pistons. One cam lobe was severely rounded and the brass retaining plate at the front of the cam had worn down to a cheesy lump. So it goes... Now comes the hard part. Rebuild stock or go for some more power? No brainer! An empty engine bay offers up a lot of possibilities...
ApproachThere is a fine line to be drawn between a nice motor that beats out the stock output but still has longevity and stability and a radical motor suited more for racing. Finding that 'fine line' and creating a recipe was my goal. There is a surprising lack of DIY documentation on the internet for getting more power out of these motors. No dyno numbers, lots of claims that should be taken with a grain of salt. Another thing to seriously consider before opening this can of worms is how much you can afford to spend. Building a stock motor ain't cheap. Building a performance motor definitely ain't cheap. Joint checking accounts with your spouse can cost you 50 hp right up front! As always - eat your receipts. My first step was to get in contact with Phil Singher, the editor of vclassics. His tech articles had helped me out a lot with my Volvo projects. Phil was breaking in his MPPE (Multi Purpose Performance Engine) and has done a lot of research into improving the output of these old pushrod motors while maintaining 'driveability' (whatever that means). His input was extremely valuable throughout this whole process. My intentions were to build a budget MPPE motor. Phil's advice steered me away from the recipe of the 'IPD motor'. IPD's Street Performance cam with associated valve bits and some head tweaking. Although the IPD kits are a tried-and-true method of developing power in these motors I was looking for something a little different. I am in no way disparaging parts or service at IPD. This company helps the vintage volvo community a great deal and their technology and sales staff are top notch. I've spent quite a bit of money with them and have yet to regret it. In the end I was looking for a recipe similar to what Edelbrock offers for Chevy and Ford motors. Phil directed me to a company little-known here in the states called Unitek. They are based 'somewhere in northern sweden' and have picked up the torch for much volvo performance from the B18 to recent OHC volvo engines. They produce modern cam grinds and assemble recipes for motors. Their Engine Guide is very good info even though most of it is in Swedish. Dealing with Unitek is a little daunting from the states. My point of contact was a man named Mike Aaro. Mike offered nearly instant email replies throughout my engine planning and really instilled confidence in this company's products and reputation. Once you actually decide what parts you want from Unitek they have very limited payment options. You need to wire money from your bank which is accompanied by a $40 charge. The current unfavorable exchange rates make the whole proposition even more expensive. Their 'Uniflow' motor setup, however, seemed to be what I was looking for so I went ahead and coughed up the extra lucre. Planning your valvetrain is a very important consideration when planning a motor. At this part of planning you need to think about a lot of variables working together for a positive net effect. If you are not thorough and thoughtful here you will be doing more harm than good in the search for power. For various reasons I decided to use the stock Djet system to provide fueling, mainly because I already owned a good functioning unit. I got lots of conflicting advice regarding Djet in performance applications. I found that people with lots of Djet experience said it would be fine and people without much experience told me it would suck. I'm an optimist so I plowed ahead. Djet is an open loop port injection system. It relies on engine vacuum for information needed to regulate the fuel mixture. A cam with significant overlap will provide low vacuum conditions at idle and throw the Djet for a loop, making the car idle like crap. More anecdotal evidence suggested the range of cams I was looking at would not be a problem. Just in case I started building a MegaSquirt DIY Fuel Injection system in case I needed it. That is the subject of an entirely different article.
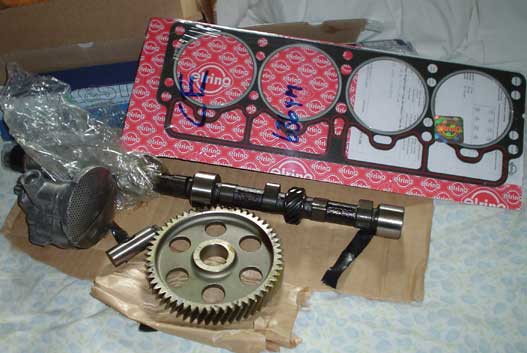
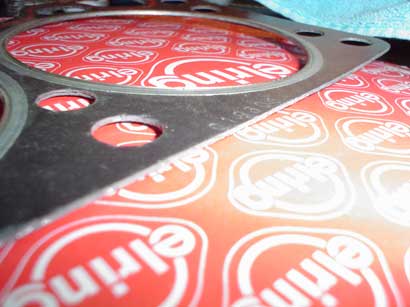
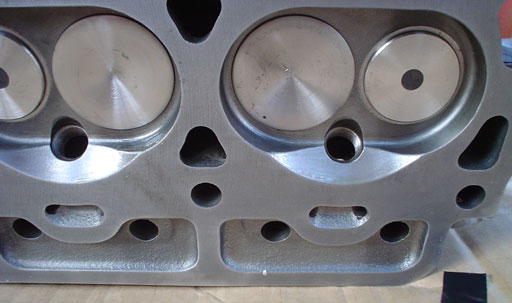
I have a lot of respect for the stock Dgrind camshaft that came in these B20s but I wanted a little more poop. 30 years of technology was sure to offer improvements in valvetrain technology over what Olaf originally put together. Unitek offers a cam with 272 degrees of (advertised) duration, .472 valve lift with stock rockers and a slightly beefier duration than the stock Dgrind or the Street Performance cam. Phil was having huge success with a similar cam with 296 duration so I took the plunge and purchased it. In addition to the cam I purchased valvesprings, retainers, lifters and steel timing gears from Unitek. I used a B20F head for this project. These are said to flow better than the "E" heads once properly ported. The problem is that the "F" heads have low compression in their stock form. 8.7:1 vs. 10.5:1 on the E heads. Sitting the two side by side you can see that the combustion chambers are dramatically different in the two heads. Now the problem is how to best raise the compression ratio in the "F" head. Some more advice from Phil and Mike educated me about piston-to-head clearance and the 'squish area'. Picture the top of the cylinder as a wide round circle. Picture the combustion chamber as an irregular ovoid wedge shaped thing. The volume between the top of the piston and the head surface is very easy to accurately change with a rudimentary knowledge of geometry. The volume of the combustion chamber can be guessed at but would take some irregular calculus to compute with any accuracy. This aside it is better for combustion to reduce the volume of the squish area than the volume of the combustion chamber. The ideal piston to head clearance is somewhere between .034" and .030". To achieve this ideal number you need to know the exact thickness of your head gasket. Typical replacement gaskets (Elring and Felpro) are offered in .050" thickness which crush to .047" when the head is bolted down. So to achieve -.034" deck height the piston will actually rise up into the head gasket .013" at the top of its travel. The stock deck height is somewhere around .023" down. Thats a .030" difference. This was a lot for my machinist to swallow but he finally reluctantly agreed to the modification.
Now even with this decrease in volume my "F" head would still only produce 9:1 compression so I needed to shave the head to get past the magical 10:1 ratio. The first step here is to CC the combustion chamber and get a real value to use in your calculations. Mine came out to 56cc's and I think the head had been decked in the past.
So now I have this great cam and a blueprinted compression ratio. What next? Motors are air pumps. The hotter cam gives the motor more pumping potential but it is not the only piece of the puzzle. It doesn't matter how far the valve opens if more air/fuel mixture can't get to the valve opening in the first place. Cleaning up the intake and exhaust ports on the heads can make a huge difference in the way your motor behaves. This is a pretty deep subject I can't really address in this space because I don't know enough about it to speak intelligently. The guy who did my cylinder head is also a great port and polish guy.
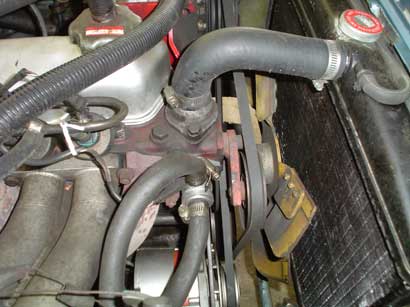
I decided that a stock bottom end was the way to go. I went to .015" over Mahle pistons and rings. There are many options with overboring on these motors that can bump up displacement but I chose to stay conservative in this department for no particular reason other than I know the stock configuration is stable and my radiator was dealing with it just fine when I took the motor down. The original main and rod bearings were in terrific shape and the journals needed just a light polish and new bearings for reassembly. I sourced updated crank seals from IPD as well as a refurbished oil pump. These motors are really straightforward but I chose to have my local machinist put together the rotating assembly. It was worth the extra labor to me. I debated on using a lighter flywheel or having my stock flywheel lightened. I got so many different opinions on this topic that I decided to do nothing. I settled on just resurfacing my stock flywheel and using a stock Sachs clutch kit. Since I was running out of money I decided to hang with the stock exhaust manifold. A wirewheel and some cast iron heat paint cleaned it up nicely. I started the motor with the stock exhaust intact. To date I still have not upgraded the air filter from the stock setup. Reliable sources indicate that maintaining the stock plumbing up to the front of the car and using an unshrouded K&N filter will yield up to 5hp in a hot motor setup. Placeing a K&N directly on the manifold will probably result in a loss of power due to the temp of the incoming air from underhood. Breakin'The initial break in involves not letting the motor idle for 30 minutes. Good to have a buddy with some knowledge on hand for this operation. After setting the static timing as best I could I cranked the motor over while my buddy gently turned the distributor for more advance. Vroom, finally. Now comes the fun part. My friend moves over and holds the throttle open, I run all over the car car looking for leaks, sparks, and flames. Apparently I made a mistake on the initial valve lash and one of my exhaust valves was not opening for the first part of the high rpm break in. Manifesting as a clanging noise from the pushrod banging around. I made the decision to shut down and check it out. After spending so much time and money getting to this point I felt like an idiot. Relashed all valves, and restarted it. We made it through the balance of the break-in period and turned it off. Some oil leaks from the sending line were repaired. I pulled the rockers off and gave the headbolts another torque. Rockers were reinstalled and set warm. I did not do anything to the stock exhaust at this point. It is interesting how different this motor sounds through the stock 2" pipes and 3 mufflers. Seemed to blat 'lemme out of here' every time I hit the pedal. Promising! A cautious (remember your cell phone) drive around the block showed some promise. Motor had a lumpy idle but pulled smooth up to 3000 rpm. 4000rpm and 3/4 throttle is what I set for my upper limit until the motor was broken in. I set the trip odometer to zero and started tweaking. 500 miles was my magic number and I wanted to get there in a hurry. It's like watching the clock on the last day of school waiting for the bell to ring. Tick Tock. I put 500 miles on the car over the following weekend. My expensive car stereo was doomed to dormancy while I listened nervously to the motor. Everything seemed to be going peachy and I was trying out speeds of 80 and higher. Varying my rpms and really digging the character of the motor. On the way home from a fairly long drive on the highway, decelerating from speed, I heard the gnarly sound of sputtering. Pissed off, I limped the car home. I was obviously missing a cylinder and I was really hoping it was something simple.
Problem solved - back to the exhaustI bolted the head back on with a new 'heavy duty' armored B20 head gasket courtesy of OJ Rallye and started putting some more miles on the car. Much better now.
The exhaust was obviously a problem. Way too restrictive for the motor in front of it. Back to the drawing board. Phil and Mike both urged that I use a header. I have used headers in other projects with other cars. They have always been a bloody nightmare for me. Even under the hood of a giant chevy they force relocation and creative wrench-holding techniques. I took the plunge and yanked the exhaust manifold off. Unbolted the downpipe and sawed at the exhaust system. Preserving the over-the-axle section for the local exhaust shop to use as a guide. I used a new gasket and some new stud hardware. The thing would not seal no matter how much I screwed with it. Turns out I really am an Idiot and did not notice the lower locating dowel peculiar to the FI engines. This is the peg that sticks out 1/4" beneath and between 2&3 on the head. The bottom flange of the header was jammed against it and I ended up warping the flange. Luckily I was able to get the header back out and file the flange back flat. I notched the flange to accept the dowel because the dowel is bloody impossible to remove while the head is on the car. It seals fine now and is truly a beautiful thing. In order to get it in there I did have to grind the edge off of my upper control arm. I also ditched the FI Manifold support bracket. Volvo obviously put this there for a reason and I will try in the near future to duplicate the function somehow. In the meantime I avoid leaning on the manifold when I set my valves. (I later rigged up the orginal support using lots of spacers - still not crazy about it...) Now that this was taken care of I drove the car up to the local meineke to have a 2.5" exhaust made up. I probably should have found a performance exhaust specialist to go to but I was having a hard time finding one (in Charlotte, NC of all places). Meineke uses nice aluminized tubing and the technician did some very good bends and welds. He did back off to 2.25". He said he did not believe he could stuff 2.5" tubing in there without going under the axle. Phil and David Hupechen both recommended the 'under-the-axle' exhaust. You remove several bends from the system and can go with whatever size tubing you desire. My reservations were not based on ground clearance but maintenance issues. If I needed to mess with the rear end suspension I would need to disconnect and lower the exhaust. I wimped out on this one and told the tech to go over the axle.
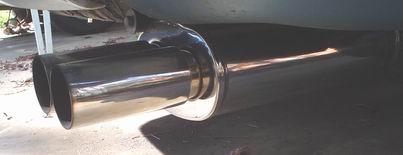
[added 12/04]: I ended up ditching the flowmaster and going with another magnaflow to terminate the exhaust, Deepened the sound a lot and removed highway harmonics that were driving me nuts. The final configuration is a good one and I would recommend it. One Magnaflow tube muffler behind the header/downpipe, terminate with another magnaflow muffler (mine is 2.25" in, 2 3" tips out). Neither of these mufflers are chambered so you could actually roll a raquetball down either one of them. They have perforated cores and are made of stainless. Note that I have my car heavily dampened for noise with Fatmat - I cannot vouch for what this would sound like without this insulation. Continuous TweakingNow that I had the exhaust straightened out it was time to pay some attention to tuning. Step 1 is to verify NO VACUUM LEAKS. Vacuum leaks make the Djet behave in unpredictable ways and all is for naught unless you get these taken care of up front. Step 2 is timing. Current gasoline and new motor dynamics throws the stock timing settings in the garbage. I found a flat stretch of road and kept bumping the timing up until I heard pinging accelerating in 4th gear. Back 2-3 degrees and locked it down. Optimum advance plays a critical role in getting the most bang out of your motor. I am using a petronix electronic ignition to replace the points in this car. Came with the car and seems to work great with the exception of a jumpy tach. I use NGK BPHS6 plugs gapped to .035.
I replaced the cracked original FI wiring harness with a good used one from Don Thibault. New coolant temp sensor and new injector seals. Map has been tested per the green book and seems to be in good shape. Injectors all spray in an OK pattern - they could probably stand a cleaning and balancing. I played around a bit with fuel pressure and the forbidden mixture screw on the djet to get the motor to run well. With this info in mind the motor was behaving pretty well without bamboozling the Djet's sensors. I could take it up to 5000rpm+ without any problems. Idle was a little rough. Plugs looked decent. Hmmmmm. Djet is smarter than I gave it credit for. Tuning the djet is why I had the O2 bung welded in. Narrowband O2 sensor with A/F gauges are notoriously unreliable. These O2 sensors are used primarily for sensing dramatic over-lean conditions in turbo applications and for making minute mixture adjustments for economic cruising in closed-loop FI systems. They are not recommended for tuning. A wideband 02 sensor is much more accurate but retail setups cost $600+ and can usually be found at a dyno shop. Some information is better than none so I blew about 60 bucks on the O2 sensor and an LED gauge. This gave me some better indication of the state of the mixture at different rpms. The problem is that this information (for my installation) is rarely accurate and just serves as a red herring most of the time. This is still the best way to get a feel for your A/F mixture. My cheapo gauge probably has much to do with the problems I have encountered. Ignition and Tach Update
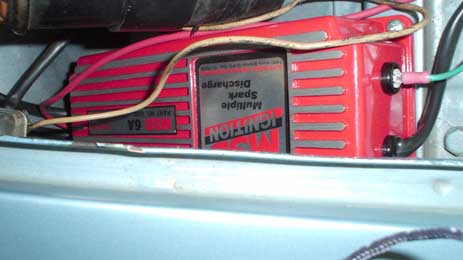
No matter how much fooling I did with the Djet and the ignition I still could not work a miss at idle. Plugs were looking a little dark but nothing that should cause problems. A friend offered me a used MSD 6A box and after some research I decided that this must be the silver bullet to cure my idle problems. I mounted the box in the small piece of real estate next to the coil on the E cars. Not much room to work and I was only able to fasten it down at two mounting points. ConclusionIn the end my car is significantly faster. I can't quantify how much faster beyond saying that it is not boring any more. That was the goal. A friend who owns a stock 71E took it for a drive. His car was the baseline that made me realize that mine was way down on power. He came back all smiles and was really impressed with the increased power. I noticed that he had the AC on the whole time as well. Good sign. It drives very well beneath 3000 rpm and gets 25mpg on the highway. Over 3000 rpm where the stock motor droned this one starts to scream and really pulls to the upper 5000's range where I let off the pedal because I am scared to break the thing. It's not a Chevy big block - but the 1800 ain't no Chevy. Mission accomplished. Having eaten all of the receipts I can't nail down my exact cost but I would definitely say it was in the sub $4000 range. The exhaust adventure ate up a quarter of that.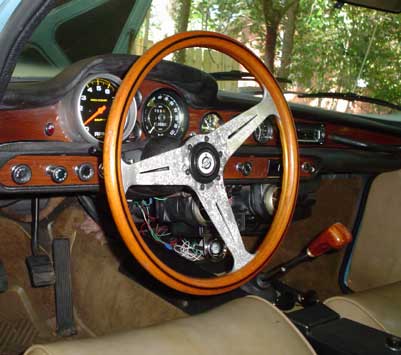
The only real variable here between mine and most performance b20 projects is the selection of camshaft. A local un-club dyno day and some comparisons with John Parker's collected dyno research will be a pretty interesting exercise. I will post my results. Let me note here that John Parker has a well documented, race-proven set of products for people seeking more performance out of their volvo pushrod motors. Given the same problem to solve all over again I would probably plunk down the dollars to buy a head and valvetrain directly from him or another volvo performance shop and would have saved some money and pain in the process. Having a reputable (choose carefully!) machine shop do the block locally is still your best bet. FIN(a followup to this article can be read here) |
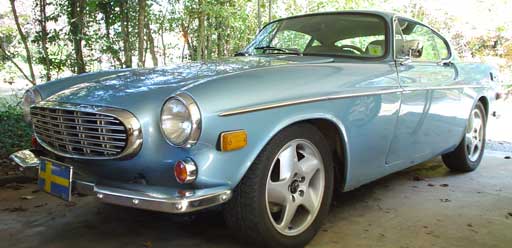 I bought my very nice 71E in March of 2003. The car had a problem in the 'pep' department. After installing new suspension, fixing some cosmetic details, and ironing out the bugs in the Djet the car was driving great and purred like a kitten despite the 176,000 miles on the odometer. Low power and some gamy compression numbers pointed to problems in the engine bay.
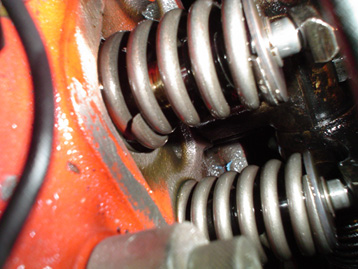
 Interestingly the valve springs are single wound with lower tension than the stock springs and they bind earlier. This threw me off a bit and I questioned Mike Aaro on the wisdom of this setup. He said these attributes were desirable and I took his word for it. Less spring tension means more power, right? Phil confirmed these spring tensions work well in his setup.
 I removed ~.040" to get a 50.5cc combustion chamber volume. My final calculated compression ratio ended up being 9.9:1. Erring on the side of caution I decided to stop there instead of going for "the big money". Anecdotal evidence from reliable sources suggests that these motors run fine on Premium gas with 10.5:1. I just didn't feel like paying the machinist for another round of measuring and shaving.
 He did a fantastic number on my head. I used a
 Pulled every plug, tested spark from each wire, tested spray and timing for the injectors, pulled the valve cover and started looking for problems on each valve. #8 valve spring had a big fat crack. Hmmmm. I called the machinist who did the head and asked for his opinion. Cracked valvesprings are a pretty rare happening outside of the racetrack. He has a good reputation and a lot of experience on projects far more radical than mine. He said metallurgy was probably the culprit. My local machinist who did the bottom end agreed. Mike at Unitek also saw this as the best explanation and apologized for the "engineering gremlins". This type of problem is always a possibility. Mike sent me a replacement valvespring but I removed all of these springs and put them in a box forever. The valvespsrings that were on the head had very similar character to the Unitek springs and had the added important attribute of having gone many thousands of miles without manifesting metallurgy problems. I would later regret not reengineering this part but I needed the car up quickly for transportation. I pulled the head to switch the valvesprings so that I could see if the valve had nailed a piston. Lucky me, everything was fine. This stage was pretty frustrating. I was out 1 very expensive headgasket and had a box of springs I was scared to use on a motor. At the same time I was relieved that the problem was not caused by an error on my part. These things happen!
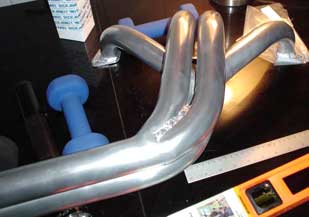 I used a clifford header on a previous b18 project and I was never completely happy with it for noise and fitment reasons. But I am an idiot so I went with a header anyway. I splurged on a Stage 1
 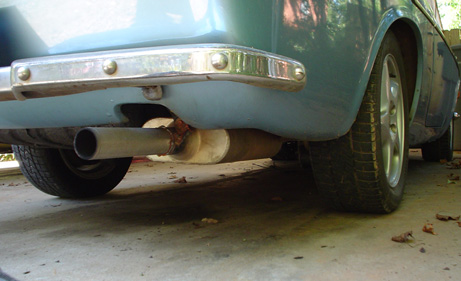 Biggest mistake was not doing my own research into mufflers. I asked the manager for a good recommendation for something that 'is not too loud - but flows really well'. He said this was an oxymoron and sold me a
 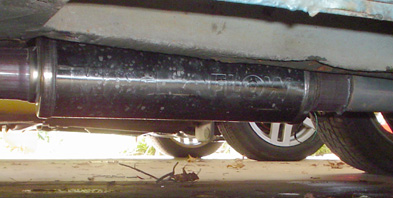 This is very similar to a
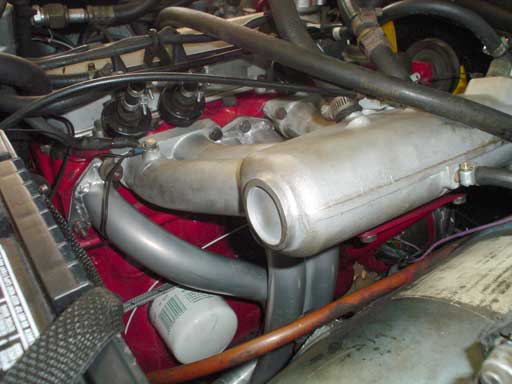
 Fired up at the first try and sounded good. Now I had to figure out how to hook up the stock tach. After a week of trying to figure it out I said 'forget about it' and bought a