
 |
Supercharged Squirted Volvo 1800EWhat the hell is wrong with me?by sberryThis article was written in June 2006. I've spent a lot of effort getting my old volvo pushrod motor into its current state and it's pretty quick for a 35 year old car. Rather than be redundant I'll point you to my other tech articles first to get a good background on the work done so far.
Last year I started talking with John Parker at VPD about his supercharger kit. At that point he had sold no units for use with injected motors and I was interested in using his kit for my project. He had other customers wanting squirted blower setups so we got the ball rolling. This project was inevitable. BeforeI had dyno numbers of 110 rwhp for my existing motor setup but I wanted more info for a baseline so I went out a few months ago and did some 0-60 times in the car. Doing all of the calculations for gearing and tire diameter the car should reach 60mph at either 4515 rpm in 3rd or 6605rpm in 2nd. My computer can log rpm and time to 1/10th of a second so I figured it would be at least as accurate as a stopwatch and I don't need assistance. I'd give this method at least a .25 second margin of error. I don't have any actual 'movement' information like mph in my logs so I'm considering the instant the clutch grabs and starts to bog the motor as the beginning of the 0-60 run and either of the above gear/rpm points as 60mph. I'm not sure what automotive people consider the official 'beginning' of a 0-60 run. Sound about right?
What is it?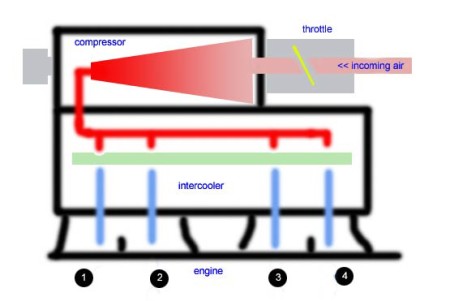 A supercharger is a compressor driven by the crank pulley. There's a really good explanation of the principles behind it on Howstuffworks.com. Essentially it uses a belt to drive an air compressor and create positive pressure, or 'boost', in the engine's intake manifold. The faster that compressor turns in relation to the engine speed the more boost is produced.
Since this air is compressed you can mix it with fuel and fit more of it in the cylinder before the spark plug fires. More air and fuel means a bigger explosion and more power. More power is more fun! As the incoming air is being compressed it heats up, hot air coming into the engine is a bad thing (promotes detonation) and will dramatically lower the amount of boost I can use. In the VPD kit a water to air intercooler is used. This is a special radiator sandwiched between the compressor and the engine that takes heat out of the incoming air and exchanges it with a small radiator in the nose of the car. The radiator uses a water/antifreeze mix and is driven by a 12v pump. The system requires lots of plumbing and some wiring but it is really very tidy. Air-to-air intercoolers are available and less complicated but they increase the size of the area intake tract the compressor needs to pressurize - the effect is slower throttle response due to increased boost lag. Low Carb DietJohn's existing supercharger installs used a carburetor in front of the supercharger to meter fuel into the compressor. My installation would retain the stock injectors to squirt fuel right before the charge enters the engine. This is an important distinction. In the carb'd version the fuel is mixed in with the air right at the throttle opening and then has to pass through several bends, the compressor rotors, an intercooler radiator and an intake manifold - this is not ideal for keeping the fuel in an atomized state when it finally gets to the combustion chamber. In theory the injected version should have an improved suspension of fuel in the incoming charge and result in better combustion and fuel efficiency. It should also help with cold starts - fuel has a tendency to cool and leave suspension as it makes it way through an obstacle course of cold metal! Since I'm not using a carburetor in my application I needed a throttlebody. Most of the research I did involved trying to figure out what throttlebody size manufacturers were using in similar size/output boosted motors. While the size of the throttlebody for an injected motor is not as critical as carb sizing it is still fairly important. Too small of a throttlebody will lead to choked maximum potential power and too large will lead to an unmanageable throttle - the tip-in will be too sensitive. Stock Volvo 850 turbo motors appeared to be using 55mm and turbo japanese
Work with what you gotSince I'd been building an naturally aspirated motor I'm at a bit of a disadvantage for applying boost. My compression ratio is 9.5:1 - a little high for a forced induction application. When people refer to compression ratio they are indicating how much cylinder pressure will be seen in the combustion chamber at the end of the compression stroke. Normal atmospheric pressure is about 14.7 psi. A 10:1 compression ratio indicates that the air/fuel charge will be at 10 atmospheres of pressure or 147psi (10 x 14.7 = 147 psi) at the top of the stroke. The higher those pressures get the more volatile the charge becomes and the more likely you are to see predetonation and detonation (knock!) as the charge lights off too soon. The highest compression ratio you can hope to run in a B20 on 93 octane fuel is 11.5:1 and most people would recommend against it. Now - if the engine attempts to compress air that is already compressed you are effectively multiplying the compression ratio of the engine. To calculate effective compression ratio use the following formula: ((boost psi / 14.7) + 1) x motor compression = effective compression. 15 lbs of boost is almost twice atmospheric pressure and would turn a 10:1 CR motor into a 20:1 motor when in boost! The key concept is that it only creates these pressures in boost conditions and allows the motor to run at more sane cylinder pressures off boost. So if you take into account that I have a 9.5:1 static compression ratio and I plan on running 10 psi of boost pressure you'll find my motor will be running a 16:1 effective compression ratio while at peak boost. This is not outrageous for a boosted motor but I don't have a whole lot of room for growth - if I raise the peak boost to 15psi I will be seeing effective compression ratios exceeding 19:1. It's hard to tell beforehand at what point adding additional boost will yield diminishing returns. High static compression ratios in a boosted motor are generally avoided for these reasons but they do give a fringe benefit of providing better off boost performance and efficiency. A lot of turbo tuners target a 7.5:1 - 8.5:1 static compression ratio because this will allow more total boost to be run but there is some argument for working with slightly higher compression ratios and less boost to acheive the same net cylinder pressures at peak boost. This concept is implemented in newer volvo engines with low pressure turbos. An additional disadvantage of pushing high boost through this motor is the mild N/A Unitek performance cam I'm running. Lift and duration are OK but it has a healthy amount of overlap dialed in. Ideally a supercharged cam will have little or no overlap - the period during which both the exhaust and intake valves are open simultaneously. This overlap period is desirable in an N/A motor for help sucking in an intake charge but under boost the dynamics change and overlap may cause the pressurized intake charge to squirt right out the exhaust valve. I'm unclear on how this will actually play out but I'm hoping it would only affect fuel efficiency. I could pull the head and replace it with a lower compression version or have my current combustion chambers carved out. I could also replace the cam with a stock C grind or go with a cam designed for the supercharger application but the blower costs a lot of money and this would push my project into a very visible position in the household ledger. I decided to proceed with the motor as it is currently configured and see how it goes. Some anecdotal evidence gathered from asking smart people indicates it will probably be fine - I will just be limited in the amount of boost I can run reliably through the motor. I tried using Boris' excellent knocksense product to help detect knock but the B20 is just too noisy. I tried 3 different locations on the motor but even at the lowest sensitivity the unit was throwing too many false positives over 4000 rpm for the unit to be anything but a distraction. It's a shame because it interfaced perfectly with the megasquirt and was pulling timing on knock - pretty neat. This just means I'll have to be really attentive to the sounds coming from under the hood and keep an eye on the plugs. I may also be able to do some more sensitive listening in a controlled environment like a dyno. The Kit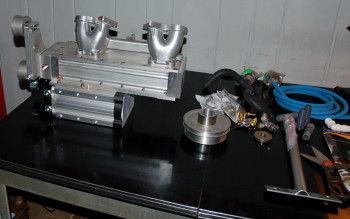
There was a period of about a year between when I ordered the blower and it showed up on my doorstep. For a good deal of that time my car was under the knife at the body shop so we delayed work. After that there was some back and forth over the throttlebody and linkage but eventually the UPS lady labored up to the porch and dropped off a 50 lb. package. The details of the kit are on John's site so I won't go into too much detail. Besides all of the major parts, John included aeroquip oil fittings and high pressure hose, hardware with lockwashers, hard to source bends for the intercooler plumbing, hose clamps - all of the little stuff you need to not have to run back and forth to the autoparts store (I hate trips to the autoparts store). The boost in the supercharger system is dictated by the size of the supercharger drive pulley. Decreasing the diameter of this pulley will spin the compressor faster for a given engine rpm and product more boost. Because of this high compression issue John suggested I start out with a relatively lower boost pulley (10psi). If the motor handles it OK then increasing the boost in the motor is as simple as swapping out that pulley for a smaller one. Install Notes (Gory Details)My install was a little different because of the fuel injection but I was able to easily use reference pictures and kit instructions to get it done over a few days time. Doing it right takes a while - lots of measuring twice and cutting once. First I had to order another fan. My existing fan occupied the space needed by the intercooler and was too thick to sandwich between the motor and the radiator - Tom Clemmer gave me Spal part #VA08-AP10/C-23A FAN (14)" (cost about $90) and that worked out perfectly. I used plastic zip ties directly through the fins of the radiator to clamp it into place. Pictures of James Alles' super-bloody-lovely 1800 and other photos from Jparker helped with intercooler plumbing and radiator installation. I used 3/16" pop rivets with aluminum strips you can buy for five dollars at home depot (in the nuts and bolts aisle standing up in racks). I took my time and made a really nice job of it. 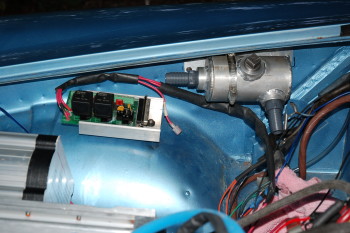
The intercooler resevoir was a little more difficult because my megasquirt relay board occupied some valuable real estate on the passenger fender and a lot of work had gone into trimming the harness into that location. Some creative rerouting cleared a nice patch of fender just aft and above the battery. Per John's suggestions I used an aluminum strip with a large hose clamp to hang the resevoir. Plumbing the system depends on what your underhood setup looks like - remember to take into account the closed position of the hood stay when routing the intercooler hose. I spent a lot of time here and had to do some tricky bends because of my odd resevoir placement but I was happy with the end result. Oiling lines to feed the supercharger were easy and all of the plumbing was provided in the kit. I used a 1/8NPT tap to install some fittings in my fuel pump block off plate. The hose and fittings provided are very high quality racecar stuff. My mangled header led to some sealing problems at first but they were fixed pretty quickly. The provided support bracket can be loosely mounted at the bottom pivot and allows you to rest the heavy compressor/intercooler lump while you position it on the studs. Access is difficult for some of the studs but wobble extensions and bruised forearms will get the job done. John warned of possible hood clearance issues so I carefully tested the clearances with plumber's putty on the high points of the motor. Sure enough the motor was sticking up too far to clear the hood support frame when shut. I replaced the motor mounts with thinner PV mounts John provided and I now have a hair of clearance. There is still minor rubbing on hard throttle but hopefully a few spacer washers under the transmission mount will solve this. Additional room could be found by slotting the motor mount ears but I don't think I'll need it. Since I did not mess with the ignition or valves startup was easy - vroom. I started the engine without the belt (NAPA 060505) on the blower to verify there were no leaks in the oiling or intercooler systems. Installing the supercharger belt is a bitch so this is an important step in case you need to take everything back down again. It's eerie to watch the engine vacuum spin the compressor around without a belt. The smaller diameter crank pulley provided in the kit forced me to run out for a new smaller alternator belt. Important! you need to fix the alternator at the farthest possible point of adjustment - the belt needs to allow adjustment as far out on the bracket as you can otherwise you will have clearance issues between the alternator pulley and the supercharger belt. Getting the supercharger belt on takes a little bit of doing but just follow the instructions and it works. Throttle linkage was easier than I thought it would be although I've rigged up extra throttle return springs to help fix sticky throttle opening (Thanks for the help Greg!). I took some measurements and came up with an ideal air filter at the handy K&N website, K&N part #RC-3870. The clearances on this filter are perfect for use with my battery (optima redtop). Measure twice before buying one! The fancy Ford idle air controller was too bulky to make work. The bypass for it was blocked off and I just give the engine a touch of the gas for a few seconds on startup. I'm still working out cold start settings but hot starts are great and it idles fairly well as low as 700rpm Up & RunningI sat down with some matrix resizing code I had written last year and compressed my old fuel and spark maps down to make room for positive pressure. I figured off boost the tune should change very little and I tried to leave this work intact. I assumed a maximum of 12 lbs. of boost and lifted some very conservative timing maps off of turbobricks. I set up target AFR's to be 12.0:1 under boost for a safe start along with maximum advance of 25degrees. Test Drive! In spite of bogging on my pig rich maps the car was a new animal. My sticky throttle had me slingshotting right on to the highway for testing it out in the longer gears. It needed lots of adjustment but the promise of buckets of usable power was shining true. The intake noise is a lot louder from the repositioning of the intake - it's loud but satisfying and really only pronounced on throttle. The whirring of the compressor on boost is music! Over the next week I did a series of tuning drives where I recorded the engine and 02 sensor parameters and then crunched them through my laptop. Solved a lot of shakedown issues like a lousy PCV system that was forcing serious Mobil1 seepage out of the rear main seal. After about 7 of these drive/tune iterations I was pretty confident in the tune so I started doing wide open runs up to redline. I turned closed loop operation on in the ECU so that the software would fill in any gaps in my tune on the fly and really dug in. Driving ImpressionsQuantitative - My boost gauge is out of convenient eyesight but datalogs say I'm seeing 9-10lbs of boost near redline. Usually when I look at it while I'm deep in the throttle it's around 6psi. I've got my rev limit set to 6500. The tune is still a little rich but it feels pretty good and I switched to some new, colder plugs. The tips are getting really sooty even running a 42 thousandths gap with the MSD box. I use the 02 sensor as a crutch for tuning and it is a few years old now - may be be losing accuracy. I have a replacement sensor in a box in the house I may throw in soon and try to get rid of the overrich conditions. I did 2 rough 0-60 runs using the same methodology as above. I wasn't comfortable redlining it yet when I did these pulls so I shifted into 3rd. This came out to about 6 seconds flat with lots of room for error. Qualitative - A whole new car - I'm speeding everywhere I go - I just jam the pedal down and smile. First gear is nearly useless. I feel a definite onset of boost come in very early and then it just keeps on pulling. Driving on the highway is really good - it behaves just like it did before the compressor until I get into the pedal and then it just goes and goes. I'm ecstatic with the performance. Still tons of room for improvement at this boost level if I can get it on a dyno. No signs or sounds of detonation. The throttle response is instantaneous - there is no boost lag and the powerband goes all the way around the tach. Right off of idle you feel the boost come in and it increases in a smooth linear pull as long as you stay in the pedal. I drive a 2005 S60R for my daily driver (for sale!) so I'm used to a hard pulling car. My 1800 is so loud and immediate that the acceleration feels comparable. According to my 0-60 run it actually is comparable (S60R does 5.7 second 0-60). I also prefer the response - no turbo lag! I can't tell you how often I find myself trapped off boost in the bottom of 2nd gear in the S60. Overall it has changed the character of the car substantially. The M41 gearing is suddenly kind of inadequate, first gear is gone by the time the clutch pedal is all the way up. 2nd gear and up really feel great, though. I'm having no problems with overdrive slippage but I haven't done much over 90mph driving. If your M41 is in good shape I see no reason it couldn't take the supercharger. I'm running a very aggressive clutchnet clutch disc so I can't comment on how the stock sachs disc would hold up. My M41 is on it's last legs (2nd gear synchros are very crunchy) so I may try to swing a T5 conversion pretty soon if I can find a buyer for my left kidney. On the autocross course it's quite a lot to deal with. My 1800 was fairly well sorted before the supercharger, turning in competitive times for a 35 year old car on street tires with a novice pilot. Strangely enough the supercharger slowed me down! The extra power had me all over the course with the back wheels loose. In my old configuration I could generally just jam the throttle down and point the car and nothing too violent would happen - now I have to learn a new driving style. :) Dyno Numbers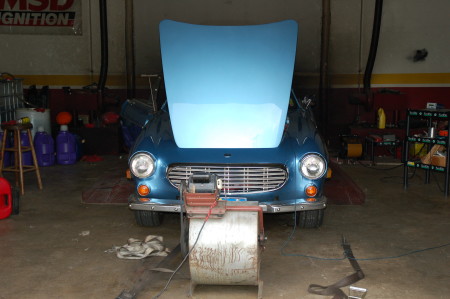
To be honest I've been diappointed with most trips to the dyno. I always get it strapped to the rollers expecting more than I actually get. This trip had some problems but I can't say I'm disappointed with the numbers this time. 155rwhp at 5800rpm and 151 ft. lb. of usable torque that stays pretty constant until the 5000+ rpm range. That's getting pretty darn close to 200 hp at the crank and there's still power hiding out in this engine I wasn't able to get to. I couldn't get a hold of Mark Riley at TurboTune on such short notice so I took the car to Belmont Precision Dyno about 20 miles southwest of Charlotte. I had been tuning the car using datalogs up to this point but the top end is best left to the dyno. Unfortunately I really didn't have my shite together for this trip. The first 3 runs were wasted trying to establish a decent safe baseline to work from. My 02 sensor readings did not agree with the readings of the rig at the dyno so most of my existing tune was pretty far off base. There was also some question of whether or not I was maxing out my injectors so we did some very rich runs as a sanity test to verify that the injectors could keep up. By the time I felt like we were getting a grip on air fuel ratios I was out of quarters. We ended up in the 12.0:1 AFR range with timing in the high 20's seeing a boost peak of about 8psi near redline. I did not get much of a chance to mess with the timing so I'm a little disappointed - next time out I'll have it together. 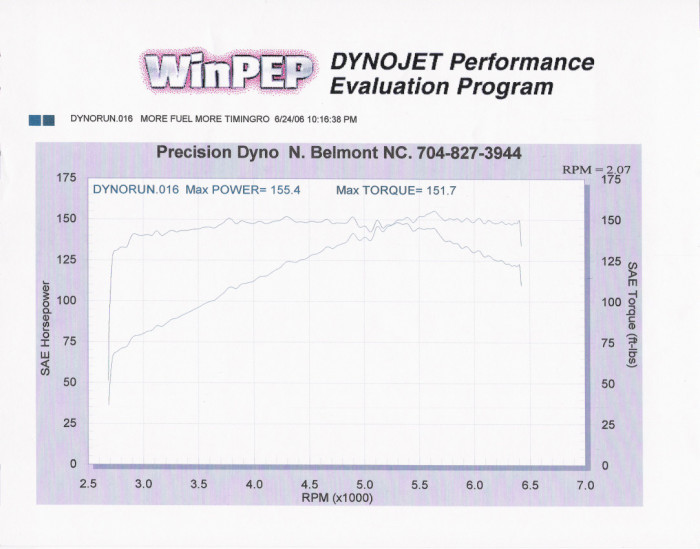
Worth it?Hell yes, I really dig it. It's got the rocks to compete with not just modern cars but modern sports cars. If you want 200hp out of a street 1800 this a good way to get there. What's the downside? Cost. It's not cheap. The fuel injected version of this kit costs over $3200. There are also more moving parts and more room for error. The rest of the car needs to be able to handle the new powerplant - my brakes and transmission seemed great before... If you get too carried away swapping out pullies you will end up with a lump under the hood. A turbo setup might be more cost effective but there are no really good kits out there (plus I don't like lag). Beyond a later OHC volvo block there are no straightforward motor swaps. I think John's prices are fair (take a look at similar kits for Miatas or MG's) The kit does exactly what it is advertised to do. 2006-06-20 |