
|
|
|
This article was written in 2004 Tuning InGetting it right by sberryDyno MightI rebuilt the B20 in my 71E this year. The goal was an NA performance street motor. An article about the process describing the approach I used can be read here So yesterday I finally got the car to a dyno. The cost was $50 for 3 runs. I paid $20 extra for wideband air/fuel measurement. Note that this is a chassis dyno that tests power at the rear wheels and should not be compared to numbers published by volvo in regards to these motors and is best used as a comparison to other volvos tested with the same equipment. Here is some good information on interpreting dyno numbers. First MeasurementsFirst run came in at 88rwhp at 4700rpm. This run alone was worth the cost of the whole session. While the car was doing excellent with normal driving it appears that under very hard acceleration my air/fuel ratio was going in the toilet. An ideal air/fuel ratio for cruising is 14.7/1 (parts air/parts fuel). Under heavy acceleration a ratio of ~13 is a good target. I had to let off the gas around 5000rpm because my mixture was entering dangerously lean territory, getting well over 16/1. Throughout the pull the mixture was definitely not ideal (never under 14). 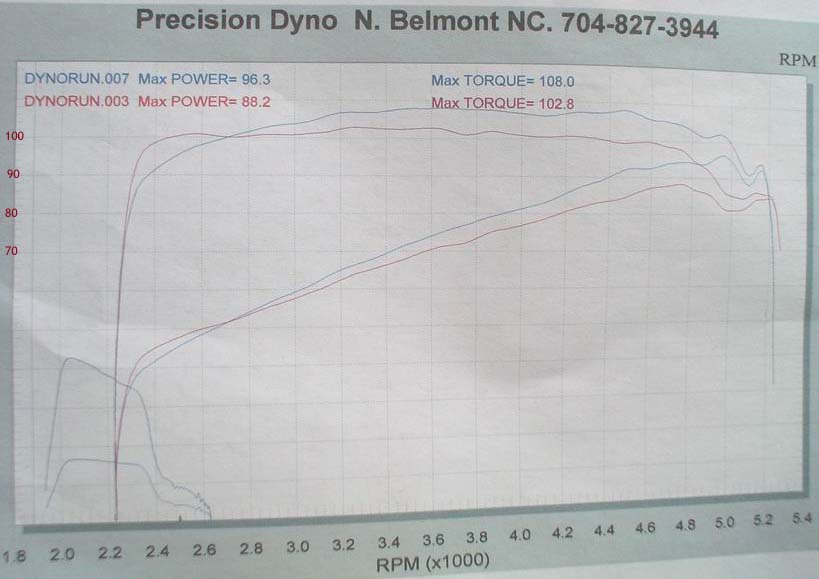 Successive runs were made with adjustments to increase fuel pressure and minor enrichment at the map sensor. The final run brought 96.3hp @ 4800rpm - still encountering a quickly leaning mixture right at 5000. Noticed that richening the mixture for top end power caused a slight drop at the beginning of the curve I am a little disappointed in these numbers but I am really glad I did it. I have revved the car over 5000 a few times while driving and I had no idea I was courting disaster. The very sudden lean-out of the mixture could turn my expensive motor into an interesting coffee table if left as-is. As the fuel leans out the combustion becomes less efficient and creates excess heat in the combustion chambers. This extra heat promotes detonation and can cause a lot of damage during hard driving (not to mention it is very bad for power). Possible theories for this lean condition include a failing fuel pump that cannot supply the demand for fuel over a certain level, worn distributor contact points that manifest as a problem at high rpm, but most likely a mixture of deficiency in the ability of Djet to be tuned for my application and a lack of effort on my part understanding the full operation of djet as it relates to mucking with the MAP sensor (manifold air pressure) and CLT (Coolant Temp sensor) resistance. I will also have the injectors cleaned and balanced before getting carried away with the throttle again. 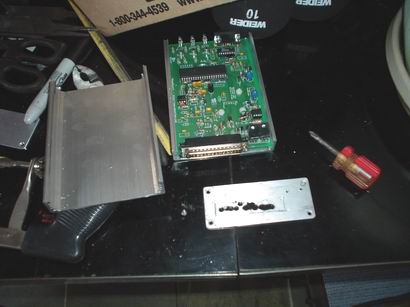
Essentially I verified that the Djet is a difficult beast to fine-tune. When I left the dyno shop my car was running way too rich under normal driving (especially cruise). I love the Djet and I'm amazed that a 30 year old computer still works so well but this testing convinced me that I will have a hard time getting the most out of the motor while maintaining driveability unless I ditch it. I am cutting the case ends for my Megasquirt unit (aftermarket fuel injection computer) as we speak and I have a new fuel pump coming next week so this should give me a lot of room to work with. I know there is a lot that can be done to tune djet but the trial and error involved is just not justified when aftermarket injection controllers can give so much higher resolution and Megasquirt weighs in at under $300 completely installed 
Once I got home I called John Parker looking for information on dyno tests he has done with stock 1800's. Looks like stock configuration turns out 85-90hp at about 5500 rpm. Did I go through all of that trouble for 6.3hp!? It is actually a little more complicated. My cam should peak out between 5500-6500 rpm. I was not able to rev the car past 5000rpm so I am probably missing some data further along the X-axis (and hopefully higher up on the Y-axis). Sloppily extrapolating this number outward will hopefully exceed 105hp. If I can get the fuel delivered properly my gains should be more than satisfactory. My initial disappointment is based on a poor tune. I think this motor has plenty of potential and seat-of-the pants measurements confirm that it is much more fun than a stock arrangement. Lack of information
This was the best $70 I spent on this project (for less than the price of a dressup valve cover...). When I started the rebuild I had a hard time finding a source of real data. Phil Singer, John Parker and David H. helped out a lot. A recent article in Rolling by John Parker broadcasts a request for others who modify these engines to get them on a dyno and send him the numbers along with details of their configuration. According to John there has been zero response. Wouldn't everyone like to know if a Street Performance IPD cam does anything but give you a lumpy idle? Are Unitek parts really worth the cost of wire transfers to Sweden? Will aftermarket fuel injection get me over 115hp? Chassis dynos have become really common and relatively cheap and results can be compared from different parts of the country with reasonable accuracy. I will hit the dyno again for tuning after I get Megasquirt installed. Megasquirt, do my biddingI am a software engineer with little experience with low-level electronics. I've been intrigued with the MegaSquirt project since it was first featured on Slashdot sometime in early 2003. It is a Fuel Injection computer that you assemble yourself. Similar aftermarket systems cost somewehere north of $1000. The best comparable one I researched was the SDS EM-4. The Megasquirt unit cost me ~$500 beginning to end including all of the ancillary doo-dads needed to finish (wiring, connectors, Throttle Position Sensor, whiskey). MegaSquirt is not for the faint of heart. I began by assembling my own unit, stimulator, and relay board. I made several novice mistakes during assembly (soldering the processor directly to the board instead of using a socket stands out) but learned quite a bit. The details of assembly are covered in great detail on the MegaSquirt site. Lance's excellent MegaManual and help from the mailing list help got me through the construction and installation process. Eric Reuter's B20 install and associated website were also a great resource. Reuter answered a lot of my stupider questions. I ended up buying a completed MS unit from a mailing list member who had an extra. This is the unit I am using allthough the one I assembled works just fine. I am going to keep that one in the trunk with a working tune as a backup.
Some of the specifics of my installation may be of interest to other 1800 folks considering going down the same path.
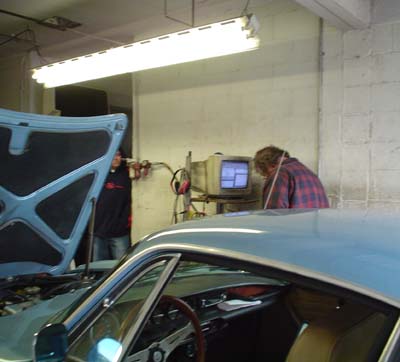
StartupUsing the various calculators available on the Megasquirt website and within the megatune software I was able to get a good baseline for startup. My inital setup connected injectors 1&4 and 2&3 to the injector banks No real method here. I selected 'alternating' injection as opposed to 'simultaneous'. 2 squirts per cycle. Req_Fuel at 8.8. (eventually scaled down to 8.2 when tuning) I hooked the MS system up to all of the points not essential to Djet operation. RPM signal from MSD, 02 sensor, Intake Air Temp Sensor, TPS, spliced the MAP vacuum. This ended up being a big rats' nest of wires under the hood but it would verify some level of operation. I started the car with Djet and observed the values in the runtime display of MegaTune (tuning software for your laptop). All systems go ... TPS shows up, Air Temp shows readings, 02 shows a bouncy AFR, MAP responds with throttle blips. During running the software shows the injectors firing - all systems go. At this point I completely unhooked the Djet and routed CLT info into MS. I used my homemade injector harness to hook the injectors up to the relay board. The engine was already warm from the Djet so I was not too worried about warmup enrichment at this point. Two cranks and it fires up! 12 cheers for Megasquirt...all grins. After that I trimmed in the rough harness I had put together. I could not drive the car until I had everything in a stable secure state underhood. I spent several hours marveling that the car was running in the driveway. I played around with idle settings until the car purred better than it had under Djet. Very satisfying. The fuel pump was the last thing to move out from under Djet's control and was the only real problem I ecountered up to this point. The culprit was a bad relay and eventually I got the car out on the road. Drives great. I feel like a spy driving around with a laptop in my passenger seat. I'm researching whether machine guns behind the headlights are covered by the 2nd amendment. 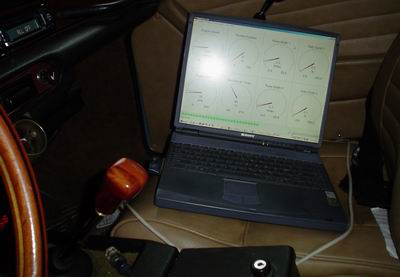
Understanding the basic concepts of operation is extremely important to get anyhere with tuning. Change and test, change and test, be methodical. The manuals for Megasquirt break it out pretty cleanly and the logging tools turn it into a solvable math problem. At this point I've got a good working setup that never runs lean but it definitely could use some work. Understanding the way the VE bins are used by the controller is really helpful. Simple and elegant. Learn how the MsTweak software works. This is a great program that does a lot of statistical operations and smoothing to help get you to a perfect tune. By my 3rd iteration of tuning I had something that would get me to work and back. It is really cool to be able to take all of your tuning issues onto your PC and work them out like a math problem. Megasquirt posed a problem for me not being experienced with troubleshooting electronics or having various scopes or really having a clue in general. The fact that I ended up with 2 units and eventually bought a preassembled one just in case is somewhat shameful. The one I built works and I'm real happy about that. I am familiar with the unit and what resistors do what and how to isolate faults. The one I bought was constructed by someone with better soldering kung-fu than me so I chose that one as the one to install. Prebuilt units are available on the mailing list for reasonable prices. I've since picked up some textbooks and have learned a number of very useful skills. I am also getting 28mpg on the highway (up from 25) and a lot less in the city. Even though I bought 2 units I still ended up several hundred dollars shy of what I would have spent had I gone with a vendor. I learned a lot about fuel injection and tuning theories and had a crash-course in PCB assembly, harness building, and all sorts of other things I find interesting but knew nothing about. The people who work on the MS project have stretched the open source ethic into DIY automotive with huge success. It is a friendly group with a supportive community that deals well with newbies. A+.
Back to the Dyno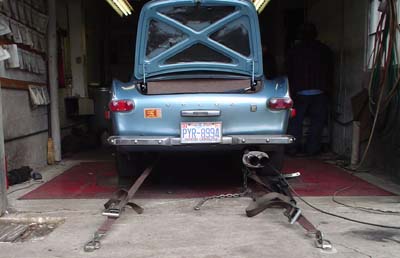
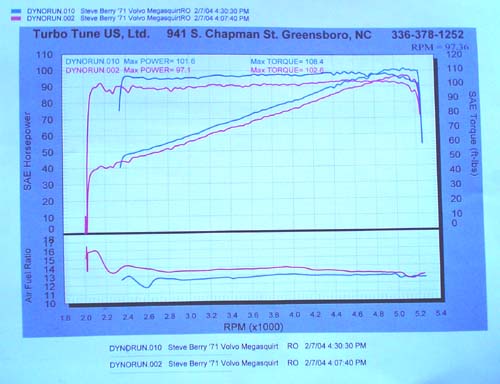
I was fortunate enough to be contacted by Mark Riley, owner of Turbotune Ltd. of Greensboro, NC. Mark has done a lot of work with aftermarket EMS systems and was interested in doing some tuning using MegaSquirt (Thanks again, Mark). The Volvo was lashed to the dyno rollers and we started. Based on my last dyno session and the miserable fueling I was getting from Djet I was expecting to see peak HP gains of 10 or more over the last session. I had done a lot of work on my VE Tables before arriving and was really looking to have Mark help me smooth them out and translate Air Fuel Ratios into peak power. The first run turned in 97 HP, 102 ft/lbs of torque using the tune I drove in with. Not bad. I was already slighty ahead of my best results from the last session. Mark logged air/fuel along with torque and hp. His measurements showed that my high end WOT was a little lean and my middle rpm WOT was a little fat. Over the course of 10 runs we tweaked these values and were able to up these numbers to 108.4 torque, 101.6 hp around 5200 rpm. The only other change I made between this run and the one documented above was adding a K&N airfilter. I netted 6hp from fueling and the airfilter. Note that these two sessions were done on two different Dynajet dynos run by different operators in different gears so the results are not easily comparable. I am suspicious of the increase of HP from one session to the next without a comparible increase in torque. Seat of the pants tell me that my motor is a hell of a lot healthier than it was before megasquirt. It runs like a dream and pulls hard! The original Djet peak of 96 was also based on a tune that ruined my daily driving range. The megasquirt peak was aquired using a tune that idles well and gets good fuel mileage.
After I got home I sent the data to Jparker and Phil Singher for official guru debriefing. After a lot of emails the collective agreement seems to pinpoint the stock valvesprings as the problem. Ignition is a possibility but I tend to suspect the valvesprings because they were probably inadequate to begin with. After this run I started wondering about my injectors. 1 was a recent replacement but the other 3 were stock items. Probably having 30+ years of service on them. Spray tests looked OK but the newest injector was definitely producing a larger quantity and smoother spray of fuel. I called the local import shop looking for a cleaning service and ended up buying 3 new injectors for ~$65 a piece (great price). After installing these new injectors with new seals I saw my AFR go rich by a full point-and-a-half across the range. Fantastic. I wish I had addressed this earlier. Car runs noticeably better although it needs to be re-tuned. What's next
|
|||||||||||||||||||||||||||||||||||||||||||||||||||||||||||||||||||||||||||||||||||||||||||||||||||||||||


 Well, once again I'm out of cash so it will be a while before I can experiment further. The next step is to send the existing head to v-performance for a ride on the flowbench and some more suitable springs. I think there is a neat opportunity here to compare the existing port and what improvements Parker can make, provided the previous head guy made no damaging cuts. I will also use a thinner headgasket and maybe mill the mating surface to get closer to a 10.5. Eric Fahlgren's